Clearing the Apocalypse Difficulty may be a difficult task for a lot of players in Remnant 2, especially for beginners, so we decided to come up with a Remnant 2 Build that will give anyone a footing in the said difficulty.
The Regenerator is a Remnant 2 Build that relies on Damage Reductions to withstand the heavy damage-dealing attacks from bosses and mobs alike. Additionally, it has insane health regeneration and great mobility. This build also counters status-inflicting attacks and commands Minions in combat.
Remnant 2 Build Guide – The Regenerator
One thing that I love about The Regenerator Build is how beginner-friendly it is. Having prior experience will not be an issue for players, as this Remnant 2 Build allows for plenty of mistakes in combat, especially when adjusting to the hardest difficulty, and still comes out just fine.
Tanking damage is the focus of this Remnant 2 Build thus, it is expected that its overall DPS will be lower than usual, so fights will be longer. However, you will be more confident in terms of survivability, even when facing the greatest threats that the game has to offer.
Remnant 2 The Regenerator Build – Archetypes
The Medic Archetype


Starting with The Regenerator Archetypes, the Prime Archetype for this Remnant 2 Build is the Medic Archetype due to its superb healing passives and its top-notch Prime Perk. Its Prime Perk Regenerator allows us to refund a Relic Charge after restoring 250 Health points to a party.
Other than your own character and players in the field, Minions are affected by this Trait so it is fairly easy to achieve the Medic’s Prime Perk’s condition.
For the Medic Skill, I suggest picking up Wellspring to have an additional source of healing other than our Relic just in case you need it. This skill places a healing puddle on the ground that provides even more Health Regen per second, useful when tanking damage.
You do have an option to use Healing Shield instead if you don’t prefer the Wellspring Skill. Healing Shield provides Shields to the party while regenerating 34% of their max health. Although I don’t use both of these skills that much when playing in single-player, since I rely on my Relic Charges alone when in need of healing and damage mitigation, these skills are still nice to have.


The Medic’s Damage Perk Invigorated is nice as well. Adding a 25% increase to all damage and 5% Critical Chance are more than welcome additions for this Remnant 2 Build to improve its overall DPS.
One of the key Perks of this build is the Medic’s Team Perk, Benevolence. What it does is, it further increases our Relic Efficacy by 15% and heals our allies. This Perk helps us achieve the Prime Perk’s condition efficiently since the total healing amount that you and your Minions will receive is more than enough to score a Relic Refund.
Lastly would be the Relic Perk Benefactor that quickens our Relic Usage Speed by 20% which stacks nicely with our Glutton Trait later on.
The Summoner Archetype


For the second Archetype, Summoner will take the spot since we will be relying on Minions in this Remnant 2 Build. I love to use the Flyer Minions for various reasons such as they seldom die in the field and can deal consistent damage to my targets. However, you are welcome to try the other two Minions available as all types can receive healing, so feel free to be creative on this one.
The Summoner’s Dominator Damage Perk synergizes nicely with this Remnant 2 Build as we will be using Mods and the 35% Mod Damage Boost and 5% Mod Critical Chance are great additions to our overall damage. As mentioned previously, your Flyers are mostly present on the battlefield so expect to have a consistent damage boost from this perk.
We will be using a lot of Relic Charges in this Remnant 2 Build thus, the Incite Relic Perk of the Summoner will be utilized. You can enjoy a constant 15% Boost to your Minion’s damage, a 15% Crit Chance Buff, and a little bit of health regeneration.
Remnant 2 The Regenerator Build – Weapons
Moving on to The Regenator’s equipment. We are going to focus mainly on Damage Reduction and survivability for this Build. In terms of DPS, our options are quite limited. For this reason, I played around a bit with Negative Status Effects as they are easy to retain. Now for the weapons.
I generally prefer automatic rifles when choosing my equipment. For this setup, I suggest using the Merciless due to its insane raw firepower alone and its ability to effortlessly inflict Bleed. This gun’s overall effectiveness is also drastically improved by its Mod, The Bloodline Mod.


This unique Mod fires a penetrating blast that can deal a considerable amount of damage, thanks to its 25% Critical Damage Bonus. Aside from it being easy to use, its Mod Power Requirement is relatively low making it accessible most of the time.
For the Merciless Mutator, I decided to use the Prophecy, one of the latest Mutators added with The Awakened King. We will be using The Bloodline Mod frequently so the Prophecy’s additional 30% Mod Power Generation at max stacks and 10% Mod Power Requirement Reduction works well with this setup, making Bloodline always accessible.


If you want more Critical Hits, Momentum is more than a qualified Mutator for the Merciless. You will have slower Mod Power Generation in exchange for more Critical Hits.
Another automatic gun that I prefer using is Tech 22. I find its speedy fire rate ideal and we will be using this gun to inflict a Burn Status effect on our targets. This is possible if you pair it with the Hotshot Mod which increases our Ranged Damage by 15% as well upon using it.

Since we will be playing with Elemental Damage and Elemental Status Effects with this Remnant 2 Build, I prefer using the Maelstrom Mutator, another new Mutator that increases the Hotshot Mod’s DPS and the 20% Mod Power Generation that this Mutator provides is a nice bonus.
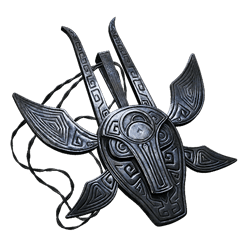
Melee Weapon – Krell Axe
Using the Krell Axe for this Remnant 2 Build is the way to go. Throwing the Krell Axe at enemies will inflict an Overloaded Status effect and deal Shock Damage. One of the latest Mutators, the Tainted Blade makes it even more potent by adding a Corroded Status when the thrown axe hits the target. This is possible since throwing the Krell Axe is considered a Charged Melee Attack.


Remnant 2 The Regenerator Build – Trinkets
Now that the weapons are out of the way, let’s discuss The Regenerator’s Trinkets. Since this Build is all about Damage Reduction, I decided to play with the Bulwark Buff. Essentially this Buff adds more damage reduction to the Build so we can effectively tank incoming damage.
For the Amulet, I suggest using the Red Doe Sigil for its additional 30% Relic Healing Effectiveness which doubles when the wearer’s health is below 50%. This makes our Relic even more effective in terms of healing.

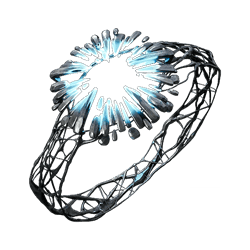
The main reason why I picked this ring is when the Ring of Omens is paired with Red Doe Sigil, it allows us to convert our regular dodge rolls to Misty Steps. This allows this Remnant 2 Build to effortlessly maneuver around the arena without any weight or movement restrictions which will be discussed later on. This special ability costs Health every time you use it but with the healing capabilities we have, it will simply not be an issue.


So the next ring on the list and also a new ring is the Dried Clay Ring which grants us with a permanent 1 stack of Bulwark upon wearing it. Aside from the Bulwark Buff, it increases this build’s overall damage depending on how many stacks of Bulwark are active.
The third ring that I find useful is the Blessed Ring. Upon using a Relic which we will be doing a lot, it grants us 2 stacks of Bulwark. In combination with the Dried Clay Ring, the build can achieve 3 stacks of Bulwark in total, which equates to an 18% Damage Reduction when the Relic Effect is active.

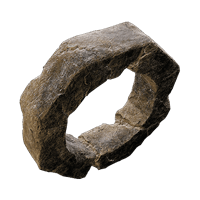
The last ring for this setup is the Seal of the Empress. Straightforwardly, this ring increases Max Health by 20 but reduces Max Stamina by 5. I like using this ring to increase my survivability and its negative effect can be disregarded since we will not be using Stamina in this build.


Remnant 2 The Regenerator Build – Armor
When it comes to Armor Sets for this Remnant 2 Build, I highly suggest wearing the Leto Mark I pieces aside from the gloves and wearing the Labyrinth Gauntlets instead. This combination will provide you with the highest Armor in the game currently.
If you do not have the Leto Mark I, I suggest equipping Leto Mark II pieces instead. Total Armor will be lower but it should work just fine. It provides good protection but it is also heavy. Wearing this set will give you the flop status when trying to dodge, that will easily be offset by Misty Step.


Remnant 2 The Regenerator Build – Relics and Traits
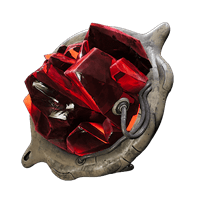
For this specific Build, Crystal Heart is the best Relic in my opinion which regenerates 145% of your Max Health over 10 seconds. Not only can it provide a massive amount of healing over time, but it also reduces incoming damage by a whopping 25% within the said duration. However, the greatest drawback of this Relic is it also reduces our Movement Speed by 50%.

In this matter, this is where the Misty Step shines again. This is one of the primary reasons why we upgraded our dodge rolls as we can freely bypass the Movement Speed debuff and effortlessly move around the battlefield.
Moving on to the Relic Fragments. I suggest slotting Health, Damage Reduction, and Healing Effectiveness. This setup is tailored to further improve our tanking capabilities. Let’s talk about the Damage Reduction Relic Fragment. The Mythic Damage Reduction Fragment grants the build an additional 5% Damage Reduction.
If you followed my previous suggestions, this Remnant 2 Build should now have a total of 79.9% total Damage Reduction when you use a Relic. With the combined Damage Reduction from the 3 stacks of Bulwark, Armor Set, the Crystal Heart Effect, Relic Fragment, and Traits, we almost reached the 80% Damage Reduction Cap.
Having a 79.9% Damage Reduction, incoming damage will be noticeably weaker and you can almost tank all types of boss attacks in the game.
The suggested Traits for The Regenerator are somewhat limited, however feel free to change what you think will work best on a specific scenario. The set of Traits that I am running is as follows:
Choosing the Medic Archetype will grant the build a free level 10 Triage that can help improve its overall health regeneration capability. Picking up the Summoner Archetype will provide a level 10 Regrowth Trait that keeps the character in good shape by further increasing health regeneration per second.


One of the reasons why this Remnant 2 Build reached our ideal Damage Reduction percentage is we upgraded Fortify to level 10. This trait increases Armor Effectiveness by 50%, so make sure to max it out as well.
Our overall damage comes from the Merciless, Minions and Negative Status Effects. For this reason, upgrading the Affliction Trait to level 10 will double all the Negative Status effect duration by 100%, leading to more damage over time.
The next Trait on the list is a level 10 Vigor to have that juicy additional 30 health points.
Accessing the Bloodline Mod as frequently as possible is ideal for this Remnant 2 Build so I suggest upgrading the Spirit Trait to level 10 to take advantage of that 20% Mod Power Regeneration.


Upgrade Bloodstream to level 10 to increase grey health regeneration by 3. This almost negates the Ring of Omen’s health cost as it leaves grey health that you can just heal in no time.
To help us cut incoming damage further, a level 10 Blood Bond is a must. This Trait allows Minions to absorb 10% of the damage taken by the caster. Your Minions will suffer additional damage every time you get hit but this is not going to be an issue as you can easily patch them up with Relics, and is actually beneficial for this Remnant 2 Build as they can help you score that Relic Refunds more frequently by having damage to heal.
The next Trait is a level 10 Glutton Trait to help us quicken our Relic usage speed. Note that the sooner the Crystal Heart takes effect, the better. Remember that a huge chunk of this build’s Damage Reduction comes from the Crystal Heart’s effect and from the Blessed Ring’s Bulwark Stacks which activate upon consuming a Relic.


Upgrading Barskin to level 5 grants the build with 5% additional Damage Reduction and this is the last bump that we need to almost reach the Damage Reduction cap. The last Trait on this list is a level 3 Fitness Trait that adds a little bit of evade distance percentage for the Misty Step.
That is already 85 points in total and if you want to prioritize movement speed and increase your Misty Step’s evade distance, I suggest, maxing out the Fitness Trait to level 10 and making Affliction Trait level 3 instead. Although you will lose the added Negative Status Effect duration bonus if you go for this route, you can just reapply each of the Status Effects at any point you desire.
Concoction
Now for the Concoction, I am running this build with Mudtooth’s Tonic to take advantage of that bonus of 25 Health points which increases this build’s survivability further.


Final Tips
A couple of useful suggestions before we wrap this Remnant 2 Build Guide. The Regenerator is an easy and fun build to play with. This build can grant anyone a much more forgiving experience especially when playing in Apocalypse Difficulty.
It can take multiple hits for you, but it is not immortal. The main goal of this build is to give you that wiggle room to adjust. Eventually, you will be learning to avoid some of the hardest-hitting attacks in the game and it is fairly easy to do with the Misty Step. So use this to your advantage when you need it.
If you are wondering how to play this build effectively, this is what I usually do in boss fights. When the battle starts, summon both of your Flyers and watch out for their Health. Heal them if necessary and try not to let them die.
Throw the Krell Axe to your target and inflict both Overloaded and Corroded Status. Then, switch to Tech 22 and activate the Hot Shot Mod to apply the Burn Status effect.
Use all of the initial Bloodline Mod charges and fire the Merciless until you regain three charges of Bloodline Mod. Use all of them again and repeat from the start to refresh or reapply all the Negative Status effects.
Using the Crystal Heart at the right moment is one of the key strategies of this Remnant 2 Build. Usually, I use it when I want to tank certain attacks instead of dodging so I can counterattack and deal damage.
Utilizing this setup will provide you with a generous amount of Relic Charges when used correctly. Thus it is advisable to determine the right situations to do so. In many instances, the Relic Refunds retained my Relic Charges at max even after a hard and long boss fight.
Log in to leave a Comment