Diablo 4 Bloodshadow Necromancer Build (LvL 70+): In this Diablo 4 Necromancer Build, I’ll show you how to play a LvL 70+ Bloodshadow Necromancer. This is a continuation of the previous Vampire Build that you can use as soon as you hit World Tier IV. If you are looking for a Build to both get you from the beginning of Tier IV up to the very late game and one that uses the Blood Surge Ability then this Diablo 4 Bloodshadow Necromancer Build Guide is for you!
Diablo 4 Bloodshadow Necromancer Build
So this Diablo IV Build still has a huge focus on Overpowering, and there are 2 ways we get Overpower. The first is from casting Blood Surge a 6th time, and the second is for every 15 seconds you remain Healthy thanks to the Rathma’s Vigor Key Passive. Your next blood attack can either be Blood Surge or Blood Mist depending on what’s happening on the screen. Don’t count out Blood Mist because this actually hits like a truck when you Overpower with it, allowing you to move through enemies and wipe out entire packs without having to use Blood Surge even once.

The general way this Bloodshadow Necromancer Diablo 4 Build works is that you’re going to activate Blood Mist into a group of enemies, and if you’re Overpowering, it’s going to hit them like a truck. If they’re weak, they’ll probably all die, or at least almost all of them. Blood Surge can then clean them up. But if it’s a strong pack, this going to drop Corpses on the ground that will explode and deal Shadow Damage as it’s left on the floor. And you’ll also deal damage as you move through them.
Doing so should get you into the center of a pack where you want to be, and then you’re going to trigger Corpse Tendrils. Since there will be Corpses on the ground, Corpse Tendrils will grab targets, pull them together, apply the Vulnerable effect, and Stun them, which is perfect for you. And then you’ll spam Blood Surge to decimate these enemies before they can even come out of being Stunned.
One of the great things about this D4 Bloodshadow Necromancer Build is it has incredible survivability because you’re going to heal yourself and apply overhealing, which provides you with Fortify. You’ll also constantly conjure Barriers, letting you go into these big crowds of enemies and survive where other Diablo IV Builds can’t. And remember that every time you Overpower, Blood Mist’s cooldown will get reduced. You’ll go in with Blood Mist, attack with Corpse Tendrils, and spam Blood Surge before moving out. If they’re not yet dead, repeat this cycle over and over until you clean up everything on the battlefield.
Diablo 4 Bloodshadow Necromancer Build (LvL 70+): Skill Distribution
Once you hit Tier IV you’ll want to start thinking about min/maxing to get the most out of your Build, and that starts with Skills. Thanks to Paragon Boards and to the increased Equipment affixes, you’ll be able to bypass most of the restrictions you previously faced while leveling up.

I also won’t get too deep into Skills, as you most probably know how they work by now.
| LEVEL 70+ NECROMANCER SKILLS | |
| Skill | Points Spent |
| Bone Splinters | 1 |
| Enhanced Bone Splinters | 1 |
| Initiate’s Bone Splinters | 1 |
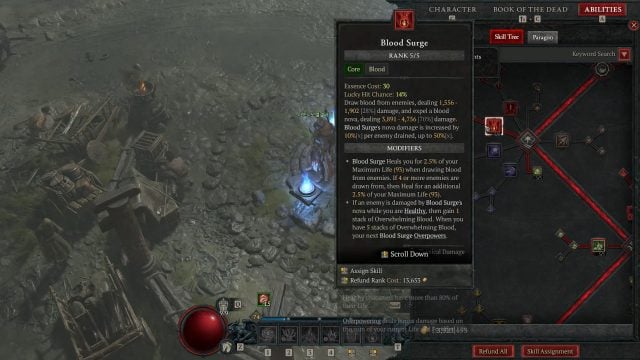
| Blood Surge | 5 |
| Enhanced Blood Surge | 1 |
| Paranormal Blood Surge | 1 |
| Hewed Flesh | 3 |
| Corpse Explosion | 5 |
| Enhanced Corpse Explosion | 1 |
| Blighted Corpse Explosion | 1 |
| Blood Mist | 1 |
| Enhanced Blood Mist | 1 |
| Ghastly Blood Mist | 1 |
| Grim Harvest | 3 |
| Death’s Reach | 3 |
| Death’s Embrace | 1 |
| Corpse Tendrils | 1 |
| Enhanced Corpse Tendrils | 1 |
| Plagued Corpse Tendrils | 1 |
| Gruesome Mending | 3 |
| Coalesced Blood | 3 |
| Tides of Blood | 3 |
| Drain Vitality | 3 |
| Necrotic Carapace | 3 |
| Bone Storm | 1 |
| Prime Bone Storm | 1 |
| Supreme Bone Storm | 1 |
| Stand Alone | 3 |
| Memento Mori | 3 |
| Rathma’s Vigor Key Passive | 1 |
Book of the Dead
- Skeletal Warriors – Sacrificed Skirmisher
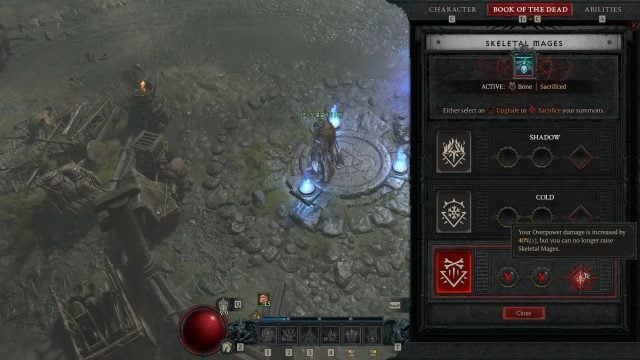
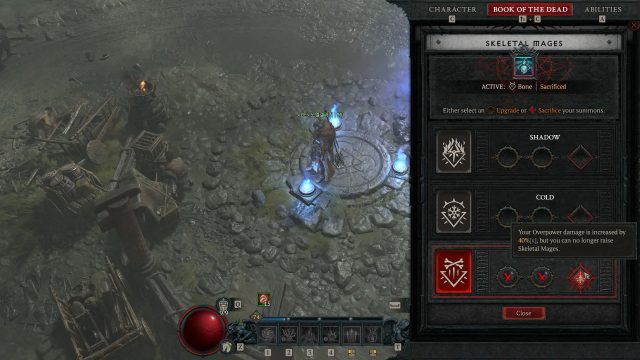
- Skeletal Mages – Sacrificed Bone
- Golems – Sacrificed Iron
Diablo 4 Bloodshadow Necromancer Build: Equipment, Gems, and Aspects
Equipment is the most important part of any Endgame Build, and It’s important to understand that it’s a long-term goal. You won’t have all Paragon Boards available right away, and getting all uniques will probably take a lot of farming, so try to use Legendary Aspects to adjust to your needs while you farm levels and better gear.
Legendary Aspects and Unique Powers
I’ll divide the Equipment into different slots, so it’s easier to understand what you should be using and what affixes you should be looking for. Remember that unique equipment has fixed affixes and powers, so if you are using one, you might need to re-slot a Legendary Aspect into a different piece.
Another important thing to notice is that, when looking for stats, you’ll want to make sure you are fulfilling your Paragon Rare Node requirements. Some rare nodes have very high requirements, and equipment is what allows you to fulfill them. These bonuses often double the rare node effect so, for example, getting an Equipment piece with +100 Dexterity might unlock one or more Node bonuses, giving you a massive bonus as a result.


Helm
Legendary Aspect
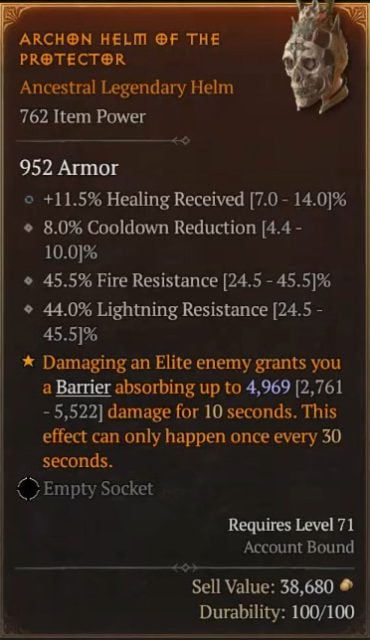
Aspect of the Protector: This provides you with a Barrier when you fight Elites and Bosses. It’s pretty much a staple for any Diablo 4 Build because having that Barrier, especially if you roll really high, will allow you to take several hits when you first enter combat against a large group of Elites. Otherwise, your Health will plummet, and your damage will go down. Remember that you deal increased damage when you’re Healthy and Fortified with this Diablo 4 Bloodshadow Necromancer Build (Lvl 70+).
Affixes
- +Healing Received
- Cooldown Reduction
An affix to look out for on your Helmet is Cooldown Reduction to be able to use Blood Mist, Corpse Tendrils, and Bone Storm more frequently. Otherwise, you’ll want a boost in Damage Reduction to live longer. Maximum Life is also really good since it lets you get more damage with Overpower the higher your Health is.
Unique Equipment
No unique Equipment is recommended for this category.
Chest Armor
Legendary Aspect
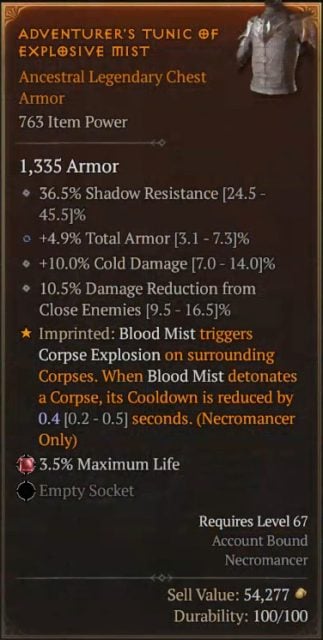
Aspect of Explosive Mist: Ideally, you’ll want this aspect on your Boots if it’s possible, otherwise, having it on your Chest Armor won’t be the end of the world. The Aspect of Explosive Mist makes it so that Blood Mist detonates Corpses as you move through enemies, which causes Shadow Damage all over the ground. And as such, it’ll replenish Essence because of this automatic triggering of Corpse Explosion while reducing the cooldown of Blood Mist, letting you use it quickly.
Aspect of Shielding Storm: Now if the Aspect of Explosive Mist can be placed on your Boots, then you’re able to opt for the Aspect of Shielding Storm, which makes it so that each time Bone Storm damages an enemy, you gain a Barrier equal to 5 up to 5% of your Base Life. This is another huge damage shield when you stack it with the Barrier from the Aspect of the Protector together with the other Damage Reduction and overhealing from this D4 Bloodshadow Necro Build. So these factors make you extremely tanky to be able to move into a large pack of enemies without dying.
Affixes
- +Total Armor
- +Cold Damage
- Damage Reduction from Close Enemies
The affixes you’ll need on your Chest Armor are those related to Damage Reduction or anything to gain more Life.
Unique Equipment
No unique Equipment is recommended for this category.
Gloves
Legendary Aspect
Blood-Soaked Aspect: This makes it so that Blood Mist leaves a trail of Shadow Damage as you move through enemies. But more importantly, it removes the Movement Speed penalty from this Skill, allowing you to surge to the center of fights more easily. So you can essentially spread that trail around more or get out of harm’s way quickly.
Affixes
- +Critical Strike Chance
- +Dexterity
- +Shadow Damage Over Time
- +Willpower
Unique Equipment
No unique Equipment is recommended for this category.
Pants
Legendary Aspect
Aspect of the Embalmer: If you don’t have the Temerity Unique Item, I would suggest imprinting the Aspect of the Embalmer on your Pants. This makes it so that consuming a Corpse has a 20-30% chance of spawning a Blood Orb to heal you more. It’s also going to overheal you, thereby helping boost your damage.
Affixes
- +All Stats
- Lucky Hit: Up to a 5% Chance to Heal X Life
- +Healing Received
- +Potion Charges
- +Potion Drop Rate
Unique Equipment
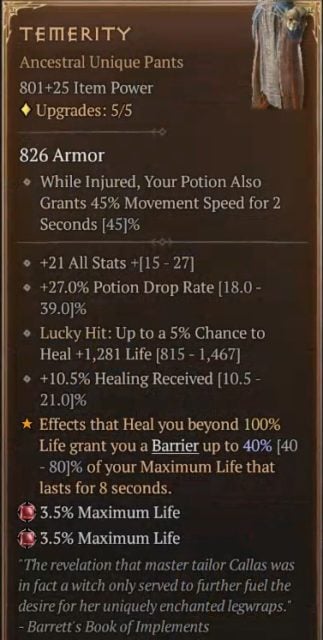
Temerity: This makes it so that certain effects, which heal you beyond 100% of your Life such as Blood Orbs or potions, grant you a Barrier of up to 80% of your Maximum Life. So if you pop a potion before going into combat then you have an extra damage shield together with the ones from the Aspect of the Protector and the Aspect of the Shielding Storm.
Theoretically, if you have all 3 of them stacked on top of each other, it’ll be very good for your Diablo 4 Bloodshadow Necro Build (LvL 70+). Additionally, Temerity increases your Potion Drop Rate, provides you with a Lucky Hit chance to heal, and raises your Healing Received. Although it’s not a must for this Build, you’ll want to have Temerity if you can in order to make you tankier.
Boots
Legendary Aspect
Aspect of Explosive Mist: This is also a good item to imprint the aspect on.
Affixes
- +Movement Speed
- +Crowd Control Duration
- +Slow Duration Reduction
Unique Equipment
Penitent Greaves: This makes it so that you leave a frost trail behind and around you to Chill enemies and increase your damage against them. Penitent Greaves is really great for this Bloodshadow Necromancer Build because it’ll inflict crowd control on targets and since you move through them with Blood Mist, you’ll be able to Chill them constantly. Additionally, you have affixes that increase your Movement Speed and Crowd Control Duration.
Note that Penitent Greaves works with one of the Glyphs we’re using, specifically the Control Glyph, which raises your damage against Chilled, Frozen, and CCed enemies in general.
One-Handed Weapon
Legendary Aspect
Blood-Bathed Aspect: This makes it so that Blood Surge’s nova echoes again to deal up to 60% less damage. So you basically get a second blood nova, which will also Overpower even if it’s for less damage.
Affixes
- +Critical Strike Damage
- +Intelligence
- +Damage to Slowed Enemies
- +All Stats
I have a One-Handed Weapon equipped for faster Attack Speed to be able to trigger Blood Surge more quickly while gaining the advantage of using more Legendary Aspects. If you use the Sword, you gain increased Critical Strike Damage, which is also nice. You also want to look out for Core Skill Damage, Damage to Close or Distant Enemies, and Damage to Stunned Enemies since you tend to hit those that have been constantly Stunned by Corpse Tendrils.
Unique Equipment
Black River: This is a Unique One-Handed Scythe that comes with Intelligence, Life on Kill, Damage to Healthy Enemies, and Ranks of Fueled by Death and Corpse Explosion. But more importantly, it makes Corpse Explosion consume up to 4 additional Corpses around the original Corpse, thereby dealing amplified damage and affecting more enemies due to having a larger radius.
When used with Blood Mist, you have a pile of Corpses on the ground so you end up gaining a ton of Essence and dealing way more damage. So if you do get the Black River, I recommend imprinting the Blood-Bathed Aspect on your Gloves instead to replace the one that’s currently being used there.
Offhand Weapon
Legendary Aspect
Aspect of Untimely Death: This makes it so that each percent of your Maximum Life you heal beyond 100% gives you extra Overpower Damage on your next attack. Since you constantly overheal with this D4 Bloodshadow Necro Build (LvL 70+) via Blood Orbs, potions, and Life on Kill, it’ll be easy to trigger. And so the extra damage will apply to your next Overpower regularly.
Affixes
- +Resource Generation
- Cooldown Reduction
- Lucky Hit: Up to a 5% Chance to Restore X Primary Resource
- Damage Reduction while Fortified
You’ll then want to equip a Focus to reduce the cooldown of Blood Mist, Corpse Tendrils, and Bone Storm. A Shield is no longer an option since you already have a lot of Barriers to make you tanky. The other bonuses to look out for are more reductions of any kind, Critical Strike Chance, and basically, anything that’s going to lower the damage you take.
Unique Equipment
No unique Equipment is recommended for this category.


Amulet
Legendary Aspect
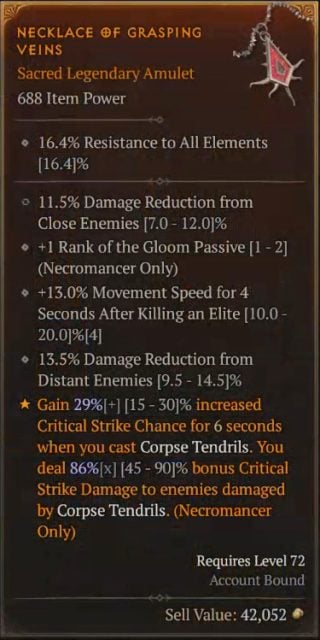
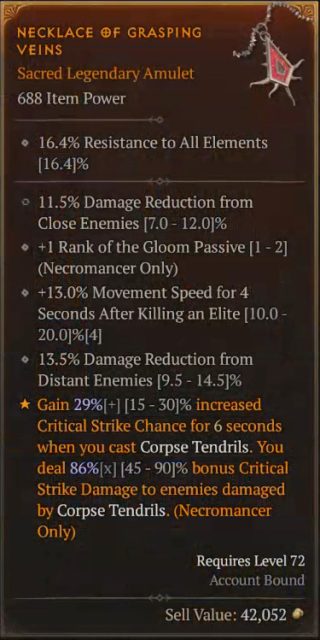
Aspect of Grasping Veins: This makes it so that you have up to 30% increased Critical Strike Chance for 6 seconds when casting Corpse Tendrils. And you also deal up to 90% Critical Strike Damage Bonus against those damaged by this Skill. So when you pull them all together and they’re Stunned and Vulnerable, you’re going to hit for 90% more Critical Strike Damage, which is incredible if you have this maxed out. The Aspect of Grasping Veins is single-handedly one of the best aspects that any Necromancer can use because it makes Corpse Tendrils a killing machine.
Affixes
- Damage Reduction from Close Enemies
- +Movement Speed for 4 Seconds After Killing an Elite
- Damage Reduction from Distant Enemies
The other bonuses to look out for is any sort of Damage Reduction or Essence Cost Reduction.
Unique Equipment
No unique Equipment is recommended for this category.
First Ring
Legendary Aspect
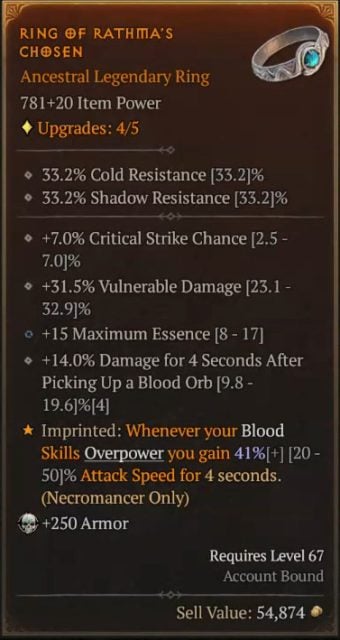
Aspect of Rathma’s Chosen: This makes it so that whenever one of your Blood Skills Overpowers, you gain up to 50% Attack Speed for 4 seconds. This is huge because it’s going to allow you to spam your Blood Surge much faster to crank up your damage.
Affixes
- +Critical Strike Chance
- +Vulnerable Damage
- +Maximum Essence
- +Damage for 4 Seconds After Picking Up a Blood Orb
On the Ring, you also want to look out for Damage to Close Enemies, increased Blood Skill Damage, or even Critical Strike Damage.
Unique Equipment
No unique Equipment is recommended for this category.
Second Ring
Legendary Aspect
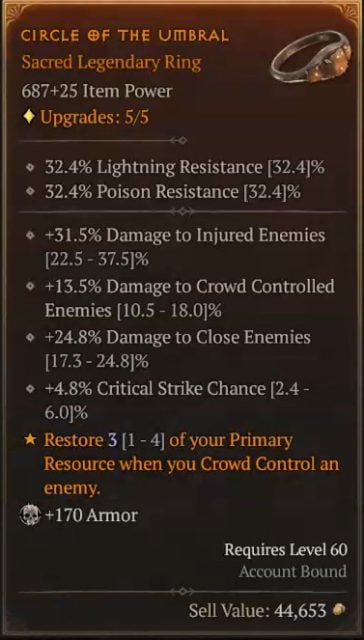
Aspect of the Umbral: This makes it so that whenever you CC an enemy, you gain up to 4 of your primary resource back. So every time you use Corpse Tendrils, you regenerate a ton of Essence. Meanwhile, Corpse Explosion or Bone Splinters is primarily used after encounters to receive more resources, especially in long fights. But you’ll want to try and end them quickly and these Skills help you do just that.
Affixes
- +Damage to Injured Enemies
- +Damage to Crowd Controlled Enemies
- +Damage to Close Enemies
- +Critical Strike Chance
Unique Equipment
No unique Equipment is recommended for this category.
Gems
For gems, you’ll want to slot:
- Weapon: Emeralds to increase Critical Strike Damage against Vulnerable enemies.
- Armor: Rubies to boost your Maximum Life.
- Jewelry: Skulls to boost your Defense value.
Paragon and Glyphs for the Bloodshadow Necromancer Build
When it comes to Paragon Boards, we are mainly going to aim for Rare Nodes that increase our damage output, as well as Glyphs that synergize with our Build. Please note that the order in which I get the Nodes is just a general guideline, and you can adjust it to your current needs.
First Paragon Board – Base
The first thing to do here is to go up the Base Board on the right-hand side and take the glyph socket to slot Essence. This increases your Critical Strike Chance with Blood Surge making it so that Critical Strikes deal even more damage to enemies that are below 80% Health, helping you finish them off more quickly.
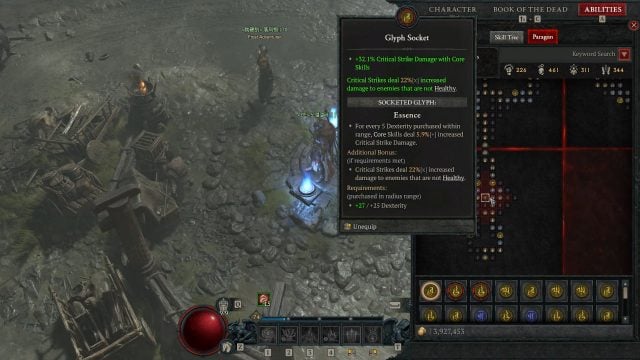

With this Diablo 4 Bloodshadow Necromancer Build (LvL 70+), there’s a huge focus on Critical Strikes. Specifically, you have a 40% Critical Strike Chance by default and then Corpse Tendrils gives an extra 30% together with an active Bone Storm will provide you with an extra 20%. In total, you’ll have 90% Critical Strike Chance, which means that with a couple of better rolls and upgrades, you can bump this to 100%!
Second Paragon Board – Bloodbath
For the next board, be sure to take Bloodbath since it has a couple of really good Rare Nodes. The first one is Guarded Advance, which makes it so that you increase your damage while Fortified on top of increasing your Fortify generation. This is going to protect you from taking damage while raising the damage you deal so you’ll want to unlock Guarded Advance and those around it.
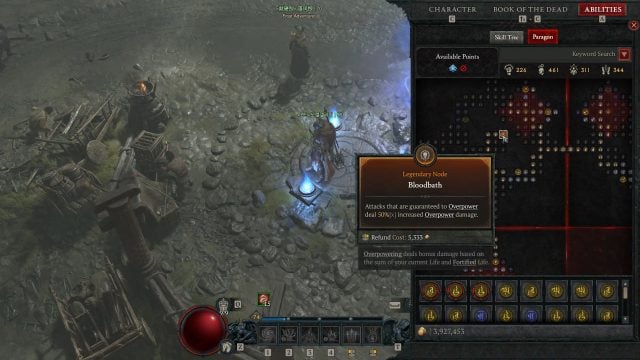

You’ll then head up and take the Bloodbath Legendary Node, which makes it so that guaranteed Overpower Attacks deal 50% more Overpower Damage. Next is the Powerhouse Rare Node to increase your damage and Overpower Damage further while Healthy. And then take those around it before heading to the right side and up.
It’s important to make your way up to the Second Glyph Socket where you’ll slot the Control Glyph, which increases your damage to CCed enemies as well as Slowed and Chilled targets if you have 40 Intelligence around it. You also gain 20% increased damage against Stunned and Frozen enemies.
Additionally, make sure to pick up the Hardened Rare Node to deal more damage while Fortified, more Intelligence, and damage versus CCed targets. And then finally, Remedy will raise your Healing Received and further raise your damage against the same type of enemies.
Third Paragon Board – Bone Graft
For the 3rd Paragon Board, you’ll pick up Bone Graft, which you’ll turn so that the Reinvigorate Rare Node is positioned to the bottom right of where you are to be able to unlock it as well as the nearby Nodes. Doing so will raise your Maximum Essence and give Essence back on kill. This makes it so that you won’t have as many resource generation issues.
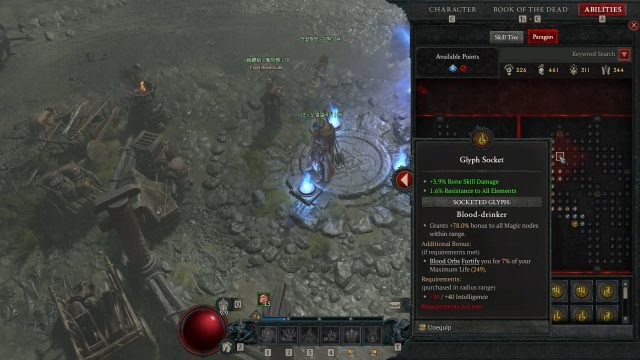

Next, you’re going to drop the Blood-drinker Glyph into the socket. With this, Blood Orbs Fortify you for 7% of your Maximum Life, and it’s really good for your Bloodshadow Necromancer D4 Build due to the numerous Nodes that give you damage while Fortified. The faster and longer you remain Fortified, the more damage you’re going to deal while remaining protected.
By having 40 Intelligence around it, you gain a bonus to all Magic Nodes within range. This means you’ll probably have to take the Shaper of Bone Rare Node, which gives additional Bone Skill Damage and Intelligence. Bone Skill Damage isn’t super helpful but you do use Bone Storm and Bone Splinters so it’ll help amplify your damage when activating these Skill.
Fourth Paragon Board – Blood Begets Blood
For the last Paragon Board, you’ll take Blood Begets Blood, which you’ll want to rotate so that the first Rare Node close to you is Invigorated. What this is going to do is increase your damage while Healthy, and also give extra damage after picking up a Blood Orb. There are also a lot of Nodes around it to further raise your effectiveness in general.
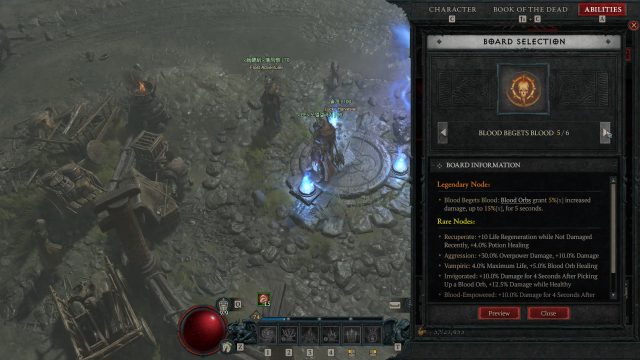

The other Rare Node near it is Aggression, which increases your Overpower Damage and overall damage as long as you meet the 605 Intelligence requirement. You’ll then want to go in the direction of bumping up your Overpower Damage until you eventually make your way up to unlock the Recuperate Passive. This raises your Potion Healing while allowing you to regenerate when you haven’t taken hits recently. Basically, staying Healthy, having high Health, and keeping your Health topped up are a huge part of this Bloodshadow Diablo IV Necromancer Build.
Final Tips
Remember to use your Skill rotation in order by starting off with Blood Mist as you’re going toward enemies, followed by Corpse Tendrils. And then once everything’s done, try and drop your Blood Surge but wait for that Stun if possible particularly when your Essence is low. If you start spamming this Skill early and you run out of resources, you’re going to be in trouble. Or maybe you’re Overpowered but even then, your targets won’t be Vulnerable nor Stunned yet so try and hold Blood Surge if you can.

It’s also important to pay attention to how much time is left until your next Overpower with this Skill. Don’t Overpower a random enemy and then run into combat, otherwise, you won’t be able to trigger this at the right time. What happens is I tend to run by stragglers and instead, seek out large groups, round them up, and then attack because it’s a waste of time to spend the same amount to kill just a single target since you’ll be able to annihilate 20 of them with this Diablo 4 Bloodshadow Necromancer Build (LvL 70+).
Another thing to take note of is to not be afraid to run away until your cooldowns come back up or for these to go into a pulse. If your corresponding Skills are not yet ready or you don’t have them set up yet, you can die really easily. So make sure to get into the rhythm first.
So that wraps up our Bloodshadow Diablo IV Necromancer Build. It’s a ton of fun if you love an AoE-centric Build where you go into Helltides and Nightmare Dungeons, just mowing down packs of enemies in seconds.
Be sure to check out our Diablo 4 Wiki for any other questions you have about the game and the Builds page if you are looking for more Diablo IV Builds, as well as our Ultimate Beginner Guide and All Classes Overview if you are looking for more Diablo 4 content!
4 responses to “Diablo 4 Bloodshadow Necromancer Build (LvL 70+)”
Hi, this build is really similar to the one I created.
I was wondering why have bone splinters? Haemorrhage gives you blood orbs and fortify that would help with the overpower damage, and Reap gives you a extra corpse to help with your cooldown for bloodmist/ extra dot damage.
Would either of these not be a greater DPS. If not could you explain why?
Thank you for your help and work
Thanks for the build!
Why do we put 3 ranks into Death’s Reach? It seems like most of the damage comes from Blood Surge and Blood Mist exploding corpses near us.
I’m probably just missing something, but I would have thought Death’s Embrace would be the one getting maxed out.
The video shows the boards: https://youtu.be/wujU3Slzg54?t=669
Please show the whole board
Log in to leave a Comment